Staging of product
Most paver tasks will vary depending on gain access to, site conditions, task size and of course, the weather. Mindful consideration ought to be taken to figure out the time to start the paver installation.
The supervisor or job supervisor ought to constantly have the materials (sand/ pavers) dispersed around the project website for efficient and simple setups. Paver pallets/bundles must be placed in a way not to interfere with the paver installation. The appropriate pallet/bundle placement can make the actual job installation much easier and quicker by decreasing the total labor of dealing with the product.
Brick paver patterns
Pavers can be put in several patterns depending on their shape. Each paver shape will generally have numerous different hatch patterns that are offered by the maker.
Contractors need to take into factor to consider the traffic weight loads on their paver projects. In the majority of applications worldwide, it has actually been revealed that pavers laid in a herringbone pattern have carried out effectively.
Pavers that are 60 mm (2 - 3/8 in) thickness appropriate for pedestrian applications. Pavers that are going to be utilized in commercial or industrial applications must be 80 mm (3 - 1/8 in) in density.
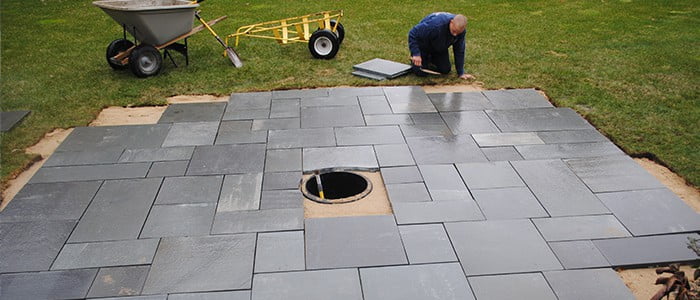
Reference/starting point for brick paver installation
There are a number of conditions that identify the beginning point of a paver task.
When starting to install pavers it is best to snap a real straight chalk line on the surface of the bed linen sand or pull a true straight string line above the surface of the bed linen sand at the ended up elevation of the pavers This will help as a guide for preserving straight joint lines and will likewise allow the installer to make adjustments in the alignment of the pavers.
Buildings and concrete curbing are usually not straight and should not be used for establishing straight joint lines. Making use of string lines is essential to determine the true straightness of the edge also. As the paver installation progresses, the string lines will help lessen the requirement for little trim pieces.
These will keep a minimum joint width and permit the bedding and jointing sand to enter between each paver. Pavers with spacer bars are typically not laid in snug versus each other given that a string line will supply constant joint spacing.
Installation of brick pavers.
One of the most widely used techniques for the installation of pavers is hand installation of each paver. It is best to install a single row of pavers along one of the true straight lines that you have pulled or above the bed linen sand. This will provide you a real and straight line off which to work. As soon as this row is developed, you can continue to work outward into the field with the rest of the pavers. Always make sure to periodically inspect your joint lines to make sure they are straight and true. If not, modifications to the pavers can be made as you continue setting up. Pavers must be set up hand tight. The best technique is to put a paver against another one and let it slide down into the bedding sand. Do not kick or tap the pavers into location as this can throw your lines out of true straightness.
When setting up pavers on a high grade, they need to be set up at the base of the grade going uphill. This will avoid the pavers from sneaking as they are being laid.
The finest method for setting up pavers on large tasks is to install them mechanically. There are a couple products a professional should think about prior to setting up pavers mechanically:
1.) Mechanical installers are just efficient in setting up pavers in certain patterns.
2.) The professional should make certain that the maker can production and bundling pavers in the preferred pattern on the pallets for easy mechanical installation.
Poor color mixing might result in an irregular looking installation. Many manufacturers are consistent with color mixing on each package of pavers, but it is the contractor's responsibility to ensure proper mixing in the field.
Cutting treatments for brick pavers.
Contractors normally have 2 ways of cutting pavers. When cutting pavers wet, it will assist reduce dust and will prolong the diamond blades life. The operator of the brick saw need to always cut the pavers away from the surface of the paver field when cutting damp, due to the truth that the pavers will create a slurry that will stain the paver surface area.
The brick saw operator must always wear the correct security that is needed for operating a saw, such as eye, ear, respiratory and hand defense ).
Edging types
Edge restraints play a significant role in the total success of an interlocking pavement installation Edging restraints get rid of lateral movement of the pavers and hold the pavers securely together. Particularly at the outer border of the paver application, without an edging restraint, your job is guaranteed to stop working in time.
Usually produced edge restraints are the most commonly utilized by contractors. Made edging restraints can range from, plastic edging, steel and aluminum, lumbers or precast concrete and stone.
Edging installation.
When installing your edge restraint, it ought to rest straight on top of the compressed gravel base. The compressed gravel base course ought to extend a minimum of 6in beyond the border of the pavers This will offer a correct structure upon which the edging restraint can sit. Manufactured edging (i.E. Plastic, steel or aluminum) need to be firmly anchored into the compressed gravel base( consult the maker's literature for the recommended spacing of the spikes). There are some edging restraints that will extend much deeper into the gravel base or beyond the base course (i.E. Timbers or poured-in-place curbs ). Edging restraints should never ever be placed straight on top of the bedding sand. This could lead to the migration of the bedding sand and ultimate lateral motion of the pavers. Geo textile material is recommended if there is a possibility of losing bed linen sand between the pavers and the edge restraint. When a gap in between the pavers and the edging exceeds 3/8" (10mm), then the area should be filled with cut pavers. All edging applications must be properly back filled after they are installed to assist provide extra stability.
Compaction of brick pavers.
After installation, the pavers need to be compressed. The entire location that is to be compressed ought to be swept tidy of any foreign objects and debris that can trigger scuffing or scratching on the surface of the pavers.
In addition, it is crucial that the first compaction takes place prior to any jointing sand has been applied to the pavers. If jointing sand is used to the pavers prior to compaction takes place, this can cause a bridging issue and will not allow the joints to be totally filled with jointing sand. This can likewise avoid the pavers from being correctly set into the bed linen sand.
When condensing the pavers, it is advised that you make at least 2 passes in various directions throughout the pavers. This will permit the pavers to be properly set in the bed linen sand and will require the bed linen sand up into the joints from the bottom of the pavers.
The compaction of the pavers is very crucial to the last efficiency of the pavers. Failure to do proper compaction can result in deformations and pavement failure gradually.
Paver pallets/bundles need to be placed in a manner not to interfere with the paver installation. One of the most commonly utilized approaches for the installation of pavers is hand installation of each paver. The operator of the brick saw should always cut the pavers away from the surface of the paver field when cutting damp, due to the reality that the pavers will develop a slurry that will stain the paver surface. Edging restraints eliminate lateral movement of the pavers and hold the pavers firmly together. When a space in between the pavers and the Tree Service Del Ray Beach edging exceeds 3/8" (10mm), then the space ought to be filled with cut pavers.